Hosting Ghost blog on Heroku!
5 mins read
Ghost is an excellent blogging platform based on the principle of simplicity and minimalism. It is built using node.js. It is an open source project and allows us to write and publish our own blogs.
Unlike PHP, there are limited number of online hosting platforms that support hosting for node.js apps although this is changing nowadays. Heroku is one such platform which provides its users with node.js hosting.
Signup for an account on heroku
To get started using ghost on heroku, first we need to create an account on heroku.
Download required tools
The tools required to get started with the deployment of ghost blog are:-
- Nodejs
- Heroku Toolbelt
- Git (Heroku toolbelt includes the setup for git)
- Ghost blog
##Procedure
- Install nodejs, heroku-toolbelt and git according to your operating system.
- Create a project directory somewhere in your filesystem (example:
mkdir /home/bitwiser/ghostblog) - Extract the downloaded ghost blog archive in this directory.
- Then open a terminal in your project (ghostblog) directory and run
npm install --production. This will fetch all the node modules required to run ghost blog. - Then create a file name .gitignore in this directory and add the directory node_modules/ in the git’s ignore list.
- Run
npm startfor the first time. This will create aconfig.jsfile in the working directory. This file contains all the settings that your ghost blog will follow. Or you can rename config.example.js to config.js. - From the terminal, run heroku login, then enter your heroku email and password when asked.
- This will authenticate your heroku account for further requests.
- Create a file named
Procfile. This file tells heroku about the commands to be run. - Open Procfile , and add web: node index.js –production.
- Now initialize a git repository in the project directory: git init.
- Add all the files to be committed:
git add .. - Commit changes:
git commit -m "first commit". - Create a heroku app:
heroku create ghostblog. - Above command will create the app which can be accessed at http://ghostblog.herokuapp.com (ghostblog name should be available).
- After running the heroku create command, remote git urls will be added to the repository.
- In development mode, ghost uses sqlite as its database. Its ok for testing, but in production, a more robust server based DB should be used.
- Open
package.jsonand somewhere in between the dependency list, add the line “pg”: “latest”, and runnpm installagain. - Heroku supports postgresql. To use this, run command
heroku addons:add heroku-postgresql:dev. After running this command, an output message like Attached asHEROKU_POSTGRESQL_AQUA_URLwill be printed on console. Note the color AQUA. This color will be used to setup the database. - Now run
heroku pg:promote HEROKU_POSTGRESQL_AQUAwhere instead of AQUA, write the color name printed on the output. - Open the config file config.js in a text editor and change some of the production config as shown.
1
2
3
4
5
6
7
8
9
10
11
12
13
14
15
16
17
18
production: {
    url: 'http://www.example.com',
    database: {
        client: 'postgres',
        connection: {
        host: process.env.POSTGRES_HOST,
        user: process.env.POSTGRES_USER,
        password: process.env.POSTGRES_PASSWORD,
        database: process.env.POSTGRES_DATABASE,
        port: '5432'
    },
    debug: false
    },
    server: {
        host: '0.0.0.0',
        port: process.env.PORT
    }
},
- The host value 0.0.0.0 tells that anyone can access the url.
- The port variable is set using the PORT environment variable passed by heroku.
- Set the url value to
http://ghostblog.herokuapp.comor if you own your own domain, you can use that too. This url value is used to construct post urls by ghost. Client variable is set to use postgres and the values of variables of connection object is set using the same way as the port, except this time, we will have to set these environment variables ourselves. We can also hardcode these values instead of using enviroment variables. But using heroku environment variable is more secure way. - To add the environment variables to heroku, first get the values of the variables from the app page on heroku dashboard (
https://dashboard.heroku.com/apps/ghostblog/resources). From here, click on Heroku Postgres :: Aqua addon. This will open a page with your database details. The page will look something like this : db-details
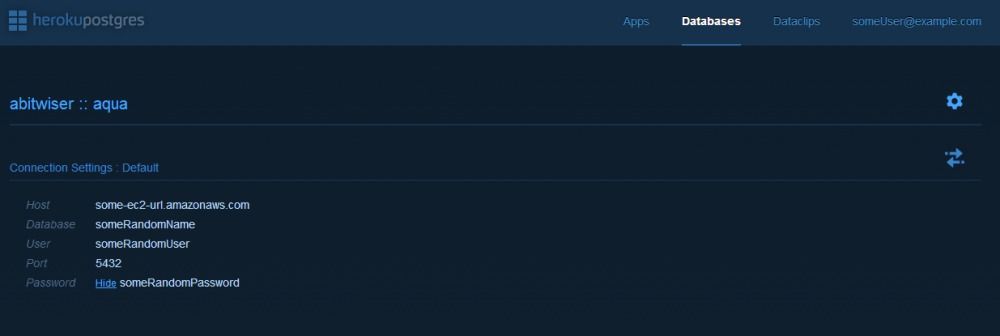
- Note the details as they will be used to add new environment variables to heroku.
-
Run the following command using the values on the database details page:
heroku config:set POSTGRES_HOST=some-ec2-url.amazonaws.com heroku config:set POSTGRES_USER=someRandomUser heroku config:set POSTGRES_PASSWORD=someRandomPassword heroku config:set POSTGRES_DATABASE=somaRandomname Once again run: git add . git commit -m "changed config.js" git push heroku master -
After the push command, heroku pushes the ghost blog files to its own servers, identifies the type of app using the Procfile file (whether the app uses node, python, php etc) and remotely installs the node modules required by ghost.
-
If everything goes right, you will have your ghost blog deployed on heroku.
- Now all you need to do is goto the url http://ghostblog.herokuapp.com/ghost in your browser and create your admin account and start blogging.
Note
You may also want to setup mail on heroku so that it is easy for you to recover your password in case you forget it. To setup mail, you can use any email service like Gmail or Hotmail or even your own email on your domain. To setup mail, edit your config.js file again to look like this:
1
2
3
4
5
6
7
8
9
10
11
12
13
14
15
16
17
18
19
20
21
22
23
24
25
26
27
28
29
30
...
production: {
    url: 'http://www.example.com',
    mail: {
        transport: 'SMTP',
        options: {
            service: 'Gmail',
            auth: {
                user: process.env.MAIL_USER,
                pass: process.env.MAIL_PASS
            }
        }
    },
    database: {
        client: 'postgres',
        connection: {
            host: process.env.POSTGRES_HOST,
            user: process.env.POSTGRES_USER,
            password: process.env.POSTGRES_PASSWORD,
            database: process.env.POSTGRES_DATABASE,
            port: '5432'
        },
        debug: false
    },
    server: {
        host: '0.0.0.0',
        port: process.env.PORT
    }
},
...
Now you will again have to setup two more env variables, MAIL_USER and MAIL_PASS.
Run:
 heroku config:set MAIL_USER=yourmail@gmail.com
 heroku config:set MAIL_PASS=yourPassword This will setup your mail account and use this mail to send you your password reset urls.
##One possible error:
You may run into an error related to your ssh key. If during the git push command, the output is this:
     Permission denied (publickey).
     fatal: The remote end hung up unexpectedly then you have to upload you public key file using the command:
heroku keys:add ~/.ssh/id_rsa.pub
replacing the key path with your actual key path in your filesystem.
- After this, you can run
git push heroku masteragain to push the files to heroku servers.